Images can help make your email more visually interesting and Horizon makes it easy to add and resize your images.
Before following the steps below, first create an email message.
Uploading an image
- In the left-hand panel with the tabs 'Custom blocks' and 'Image Upload', click the 'Image upload' tab.
- You will see what folder you are in by looking at the 'Path' field.
Double-click the folder you would like to go to, or double-clickto go to the folder above (e.g. to go to $Home from $Home/Images).
- Drag and drop the image from your computer to where it says 'Drag files here'.
- You'll see your file appear, labelled as '0%'. Click Upload Your file has been uploaded when it reaches 100%
Click 'clear' to go back to the 'Drag files here' option, or drag files here to upload more images. - Alternatively, to upload an image, you can click the green cloud, under the 'Drag files here' option. Here you can select the image from your computer by clicking ... by the 'Source' field
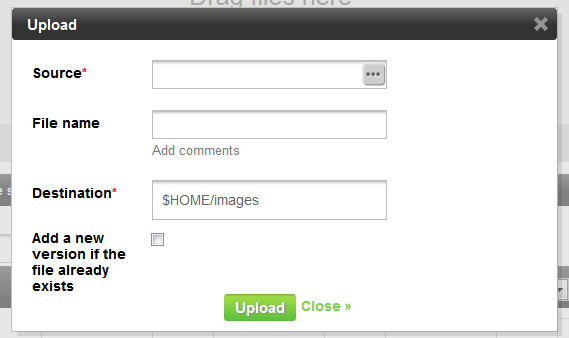
- Once you've your image from your computer, you can click Upload. If you want to add a file name or you want the file to replace a file if it already exists, remember to do this before clicking the 'Upload' button.
Adding an image
- Click in the content where you want the image to go or alternatively, if you have an image placeholder, double-click this and go to step 3.
- In the editor toolbar (above your content), click the 'Image' icon
- In the window that pops up, you'll need to click ... to the right of the 'URL' field to select your image.
- Select your image by double-clicking it, or single clicking it and clicking 'Select' at the bottom of the window
- Back on the 'Image properties' window, you can change the image by editing any of the fields, however this is optional. Details of each field is explained below. You can see any changes you make in the preview box on the right.
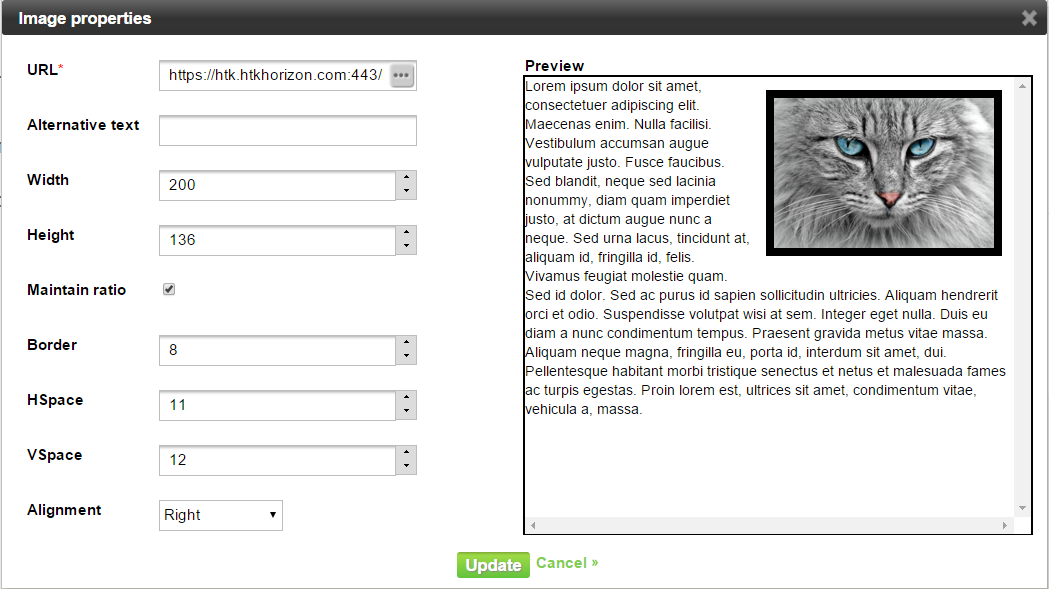
- URL: An URL will generate automatically, pointing to the location of your file stored in Horizon (clicking the '...' will allow you to select a different image)
- Alternative text: If the email recipient has disabled the loading of images, this text will be shown instead.
- Width and Height: If you're using a mobile-responsive email template or a image placeholder, it's best to just set a width and allow the image height to change automatically.
- Maintain ratio: This is automatically ticked to ensure your image doesn't get stretched as you resize it. If you're using a mobile-responsive email template, leave it unticked.
- Border: This is automatically set to 0 for no border. You can add a border and adjust the size by typing in a value or using the up and down arrows.
- HSpace: Set the amount of space to the left and right of your image to separate it from the surrounding text.
- VSpace: Set the amount of space above and below your image.
- Alignment: Align your image with the text around it.
Once your image is added to your message, you can hover over the image and make the image fill the box by double-clicking , or click and drag
to manually resize it.